go-console
GoConsole: New Update! thanks all of you for your advice and your help. I have updated the library to be more flexible and more powerful. I have also added a lot of new features.
- Adding a parser for JSON, Map, Struct and List to easily display data in a table
- Adding a wrapper called go_console.Command to manage multiple go_console.Scripts
- Automated generation of help messages for both the wrapper and scripts
- Adding better validation of user input
- Constants are now all in Pascal case
- go_console.Script now implements the io.Writer interface
- Capability to configure via Type or fluent setter I’m particularly excited about the new wrapper, which provides more flexibility for managing multiple scripts. Additionally, the automated help message generation will make it easier for developers to understand how to use GoConsole. I’m grateful for the feedback and support of the Go community, and I hope these changes make GoConsole an even more useful tool for everyone. You can find the updated code on the project’s GitHub repository: https://github.com/DrSmithFr/go-console. Thank you again for your help and support!”
![]()
The Go console component

![]()
The Console component eases the creation of beautiful and command line interfaces.
GoConsole component allows you to create command-line commands. Your console commands can be used for any recurring task, such as cronjobs, imports, or other batch jobs. Command arguments and options follow the docopt standard. This library provide several helper for styling of the command’s output.
GoConsole is a lightweight equivalent in Go to the Console Component 3.4 of Symfony PHP framework.
Installation
go get github.com/DrSmithFr/go-console
Tables of Contents
- go_console.Command
- go_console.Script
- How to use input options and arguments
- How to style the console output
- Helper Methods
- How to Color the Console Output
-
How to use verbosity levels
- How to ask for user input
- How to display tables in the console
go_console.Command
Defined an entry point for multiples scripts
go_console.Command Provides an entry point for multiple scripts.
It allows you to define easily a group of scripts, but you MUST define Name and Runner for each go_console.Script.
Note: The
go_console.Commandwill automatically call thego_console.Script.Build()method when the script get invoked.
package main

import (
  "fmt"
  "github.com/DrSmithFr/go-console"
  "github.com/DrSmithFr/go-console/input/argument"
  "github.com/DrSmithFr/go-console/input/option"
)

func main() {

  script := go_console.Command{
    Description: "This Command act as a group of command.",
    Scripts: []*go_console.Script{
      {
        Name:        "external",
        Description: "Print hello world form an external runner.",
        Arguments: []go_console.Argument{
          {
            Name:        "name",
            Value:       argument.Required | argument.List,
            Description: "The name of the user.",
          },
        },
        Runner: externalRunner,
      },
      {
        Name:        "internal",
        Description: "Print hello world form an internal runner.",
        Options: []go_console.Option{
          {
            Name:        "foo",
            Shortcut:    "f",
            Value:       option.None,
            Description: "The foo option.",
          },
        },
        Runner: func(cmd *go_console.Script) go_console.ExitCode {
          cmd.PrintTitle("Hello world! (internal runner)")
          cmd.PrintText("Hello world!")

          if option.Defined == cmd.Input.Option("foo") {
            cmd.PrintText("foo option is defined")
          }

          return go_console.ExitSuccess
        },
      },
    },
  }

  // This start the command logic.
  script.Run()
  // There must have no code after this line as script.run() call os.Exit() on completion.
}

func externalRunner(cmd *go_console.Script) go_console.ExitCode {
  cmd.PrintTitle("Hello world! (external runner)")

  name := cmd.Input.Argument("name")

  _, err := fmt.Fprintf(cmd, "Hello %s!", name)

  if err != nil {
    panic(err)
  }

  cmd.PrintText("Hello world!")

  return go_console.ExitSuccess
}
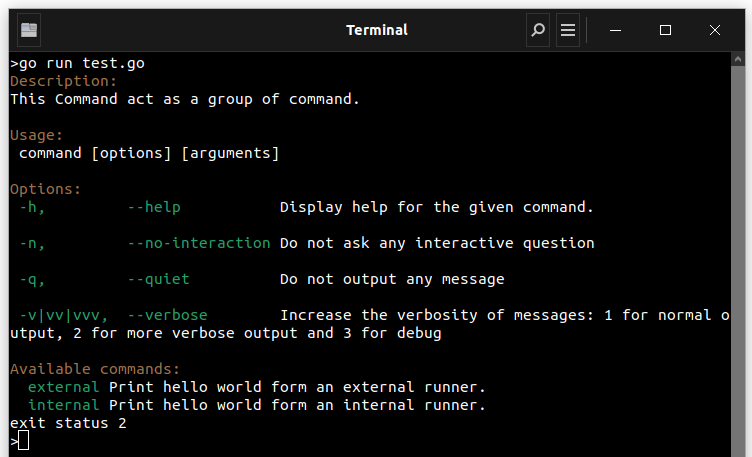
Calling a command without arguments (or with only –help) will display the help
Defined an entry point for multiples scripts using namespaces
Sometimes, you want to group your scripts by namespace because you have a lots of them and/or you want to avoid name collision.
You can do it by using the go_console.Script.UseNamespace property.
package main

import (
  "fmt"
  "github.com/DrSmithFr/go-console"
)

func main() {

  script := go_console.Command{
    UseNamespace: true, // Enable namespace
    Description: "This Command act as a group of command.",
    Scripts: []*go_console.Script{
      {
        Name:        "app:user:create",
        Description: "Print hello world form an external runner.",
        Runner:      displayCommandName,
      },
      {
        Name:        "app:user:promote",
        Description: "Print hello world form an external runner.",
        Runner:      displayCommandName,
      },
      {
        Name:        "app:user:revoke",
        Description: "Print hello world form an external runner.",
        Runner:      displayCommandName,
      },
      {
        Name:        "cache:clear",
        Description: "Print hello world form an external runner.",
        Runner:      displayCommandName,
      },
      {
        Name:        "cache:warmup",
        Description: "Print hello world form an external runner.",
        Runner:      displayCommandName,
      },
      {
        Name:        "database:create",
        Description: "Print hello world form an external runner.",
        Runner:      displayCommandName,
      },
      {
        Name:        "database:drop",
        Description: "Print hello world form an external runner.",
        Runner:      displayCommandName,
      },
      {
        Name:        "database:migration:migrate",
        Description: "Print hello world form an external runner.",
        Runner:      displayCommandName,
      },
      {
        Name:        "server:start",
        Description: "Print hello world form an external runner.",
        Runner:      displayCommandName,
      },
      {
        Name:        "server:stop",
        Description: "Print hello world form an external runner.",
        Runner:      displayCommandName,
      },
    },
  }

  // This start the command logic.
  script.Run()
  // There must have no code after this line as script.run() call os.Exit() on completion.
}

func displayCommandName(cmd *go_console.Script) go_console.ExitCode {
  cmd.PrintTitle(fmt.Sprintf("Command %s", cmd.Name))
  return go_console.ExitSuccess
}
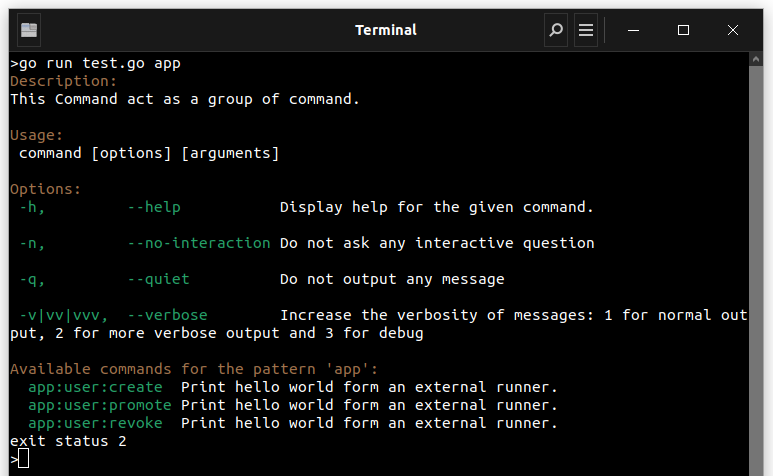
Calling the command without arguments (or with only –help) will display the help, sorted by namespace

Autocompletion when using namespaces
When using namespaces, the autocompletion feature is enable by default. If autocomplete detect multiple possibilities, it will display them.
Autocomplete works with namespaces, so it will autocomplete every part separated by :.
So, all the following commands are equivalents:
./command app:user:create
./command app:user:cr
./command app:us:cr
./command ap:us:cr
./command a:u:c
As long as the autocomplete can find a unique command, it will execute it.
go_console.Script
When you want to create a simple command, you must create a go_console.Script object.
In this case, can get rid of go_console.Script.Name and go_console.Script.Runner.
Note:
go_console.Script.Runnerwill be executed when.Build()is called. (if defined) ```go package main
import ( “github.com/DrSmithFr/go-console” “github.com/DrSmithFr/go-console/input/argument” “github.com/DrSmithFr/go-console/input/option” )
func main() {
// // Easy way to create a command with arguments and options //
cmd := go_console.Script{ Description: “The app:command command.”, Arguments: []go_console.Argument{ { Name: “name”, Value: argument.Optional | argument.List, Description: “The name of the user.”, }, }, Options: []go_console.Option{ { Name: “foo”, Shortcut: “f”, Value: option.None, Description: “The foo option.”, }, }, }
cmd.Build() }
## Script Help

We strongly recommend that you define a description for your command, arguments and options. This will be displayed when the user runs
`./command --help`

<p align="center">
    <img src="docs/assets/command/script-show-help.png">
</p>

## Script Input

The most interesting part of the commands are the arguments and options that you can make available. These arguments and
options allow you to pass dynamic information from the terminal to the command.

### Using Arguments

Arguments are the strings - separated by spaces - that come after the command name itself. They are ordered, and can be
optional or required and/or list.

```go
package main

import (
  "fmt"
  "github.com/DrSmithFr/go-console"
  "github.com/DrSmithFr/go-console/input/argument"
  "github.com/DrSmithFr/go-console/input/option"
)

func main() {

  // Declare the command with a struct
  cmd := go_console.Script{
    Description: "This is a test command",
    Arguments: []go_console.Argument{
      {
        Description: "The last name of the user",
        Name:        "name",
        Value:       argument.Required,
      },
    },
    Options: []go_console.Option{
      {
        Description: "The last name of the user",
        Name:        "foo",
        Shortcut:    "f",
        Value:       option.None,
      },
    },
  }
  // Build the command before using it
  cmd.Build()

  //
  // You now have access to a last_name argument in your command:
  //

  text := fmt.Sprintf("Hi %s", cmd.Input.Argument("name"))

  lastName := cmd.Input.Argument("last_name")

  if lastName != "" {
    text = fmt.Sprintf("%s %s", text, lastName)
  }

  // Using the Output as an io.Writer
  _, err := fmt.Fprintf(cmd.Output, "%s", text)

  if err != nil {
    panic(err)
  }

  // Using the Output Methode
  cmd.Output.Print("!")
}
The command can now be used in either of the following ways:
go run command-script John
> Hi John!

go run command John Smith
> Hi John Daligault!
It is also possible to let an argument take a list of values (imagine you want to greet all your friends). Only the last argument can be a list:
package main

import (
  "fmt"
  "github.com/DrSmithFr/go-console/input/argument"
  "github.com/DrSmithFr/go-console"
)

func main() {
  cmd := go_console.
    NewScript().
    AddInputArgument(
      argument.
        New("names", argument.List | argument.Required).
        SetDescription("Who do you want to greet?"),
    ).
    Build()

  //
  // You can access the names argument as an array:
  //

  names := cmd.Input.ArgumentList("names")

  for _, name := range names {
    cmd.PrintText(fmt.Sprintf("Hi %s!", name))
  }
}
To use this, specify as many names as you want:
go run command-script John Alex Fred
There are three argument variants you can use:
argument.Required
The argument is mandatory. The command doesn’t run if the argument isn’t provided;
argument.Optional
The argument is optional and therefore can be omitted. This is the default behavior of arguments;
argument.List
The argument can contain any number of values. For that reason, it must be used at the end of the argument list.
You can combine List with Required and Optional like this:
cmd := go_console.
  NewScript().
  AddInputArgument(
    argument.
      New("names", argument.List | argument.Required),
  ).
  Build()
Using Command Options
Unlike arguments, options are not ordered (meaning you can specify them in any order) and are specified with two
dashes (e.g. --yell). Options are always optional, and can be setup to accept a value (e.g. --dir=src) or as a
boolean flag without a value (e.g. --yell).
For example, add a new option to the command that can be used to specify how many times in a row the message should be printed:
package main

import (
  "fmt"
  "github.com/DrSmithFr/go-console/input/argument"
  "github.com/DrSmithFr/go-console/input/option"
  "github.com/DrSmithFr/go-console"
  "strconv"
)

func main() {
  cmd := go_console.
    NewScript().
    AddInputArgument(
      argument.
        New("name", argument.Required).
        SetDescription("Who do you want to greet?"),
    ).
    AddInputOption(
      option.
        New("iterations", option.Required).
        SetDescription("How many times should the message be printed?").
        SetDefault("1"),
    ).
    Build()

  //
  // Next, use this in the command to print the message multiple times:
  //

  iterations, _ := strconv.Atoi(cmd.Input.Option("iterations"))

  for i := 0; i < iterations; i++ {
    cmd.PrintText(
      fmt.Sprintf("Hi %s!", cmd.Input.Argument("name")),
    )
  }
}
Now, when you run the command, you can optionally specify a --iterations flag:
# no --iterations provided, the default (1) is used
$ php bin/console app:greet John
 Hi John!

$ php bin/console app:greet John --iterations=5
 Hi John!
 Hi John!
 Hi John!
 Hi John!
 Hi John!


$ php bin/console app:greet John --iterations=5 --yell
$ php bin/console app:greet John --yell --iterations=5
$ php bin/console app:greet --yell --iterations=5 John
You can also declare a one-letter shortcut that you can call with a single dash, like -i:
cmd := go_console.
  NewScript().
  AddInputOption(
    option.
      New("iterations", option.Required).
      SetShortcut("i"),
  ).
  Build()
Note that to comply with the docopt standard, long options can specify their values after a white
space or an = sign (e.g. --iterations 5 or --iterations=5), but short options can only use white spaces or no
separation at all (e.g. -i 5 or -i5).
While it is possible to separate an option from its value with a white space, using this form leads to an ambiguity should the option appear before the command name. For example,
php bin/console --iterations 5 app:greet Fabienis ambiguous; Go-console would interpret 5 as the command name. To avoid this situation, always place options after the command name, or avoid using a space to separate the option name from its value.
There are four option variants you can use:
option.List
This option accepts multiple values (e.g.
--dir=/foo --dir=/bar);
argument.None
Do not accept input for this option (e.g.
--yell). This is the default behavior of options;
argument.Required
This value is required (e.g.
--iterations=5or-i5), the option itself is still optional;
argument.Optional
This option may or may not have a value (e.g.
--yellor--yell=loud).
You can combine IS_ARRAY with REQUIRED and OPTIONAL like this:
cmd := go_console.
  NewCli().
  AddInputOption(
    option.New("iterations", option.List | option.Required),
  ).
  Build()
How to Style the Console Output
One of the most boring tasks when creating console commands is to deal with the styling of the command’s output, this library provide several helper for that.
package main

import (
  "github.com/DrSmithFr/go-console"
  "github.com/DrSmithFr/go-console/input"
  "github.com/DrSmithFr/go-console/output"
)

func main() {
  // create default console styler
  cmd := go_console.NewScript()

  // or create styler with custom OutputInterface
  in := input.NewArgvInput(nil)
  out := output.NewCliOutput(true, nil)

  cmd2 := go_console.NewScriptCustom(in, out, true)

  // add title
  cmd.PrintTitle("Lorem Ipsum Dolor Sit Amet")

  // you still access the OutputInterface
  cmd2.Output.Println("<info>some info</>")
}
Note:
OutputInterface and go_console.Cli implements io.Writer interface, so fmt.Fprint() can be used
package main

import (
  "fmt"
  "github.com/DrSmithFr/go-console"
)

func main() {
  cmd := go_console.NewScript().Build()
  out := cmd.Output

  // Using OutputInterface or go_console.Cli helper to display styled text
  out.Println("<info>This message has displayed by <b>Output.Println()</b>")
  cmd.PrintText("<info>This message has displayed by <b>go_console.PrintText()</b>")

  // Or using fmt.Fprint() with OutputInterface or go_console.Cli as io.Writer
  fmt.Fprintln(out, "<info>This message</info> using <b>Fprintln with Output</b>")
  fmt.Fprintln(cmd, "<info>This message</info> using <b>Fprintln with go_console</b>")
}
Helper Methods
Titling Methods
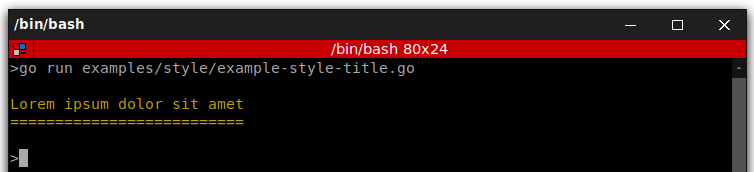
title()
It displays the given string as the command title. This method is meant to be used only once in a given command, but nothing prevents you to use it repeatedly:
cmd.PrintTitle("Lorem Ipsum Dolor Sit Amet")
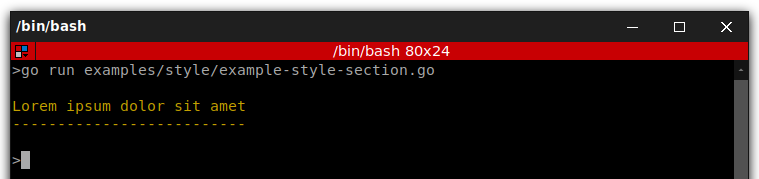
section()
It displays the given string as the title of some command section. This is only needed in complex commands which want to better separate their contents:
cmd.PrintSection("Lorem Ipsum Dolor Sit Amet")
Content Methods
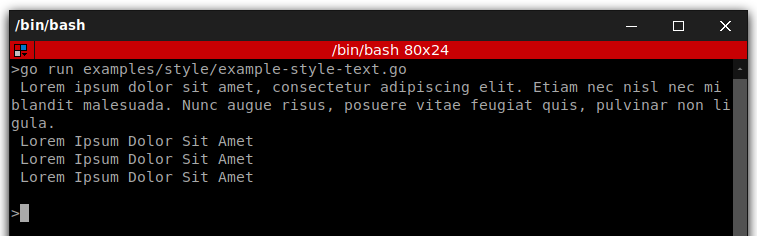
text()
It displays the given string or array of strings as regular text. This is useful to render help messages and instructions for the user running the command:
// use simple strings for short messages
cmd.PrintText("Lorem Ipsum Dolor Sit Amet, [...]")

// consider using arrays when displaying long messages
cmd.PrintTexts([]string{
  "Lorem Ipsum Dolor Sit Amet",
  "Lorem Ipsum Dolor Sit Amet",
  "Lorem Ipsum Dolor Sit Amet",
})
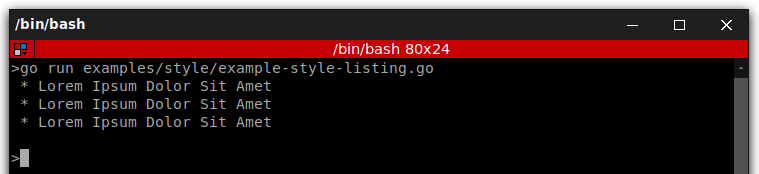
listing()
It displays an unordered list of elements passed as an array:
cmd.PrintListing([]string{
  "Lorem Ipsum Dolor Sit Amet",
  "Lorem Ipsum Dolor Sit Amet",
  "Lorem Ipsum Dolor Sit Amet",
})
newLine()
It displays a blank line in the command output. Although it may seem useful, most of the times you won’t need it at all. The reason is that every helper already adds their own blank lines, so you don’t have to care about the vertical spacing:
// outputs a single blank line
cmd.PrintNewLine(1)

// outputs three consecutive blank lines
cmd.PrintNewLine(3)
Admonition Methods
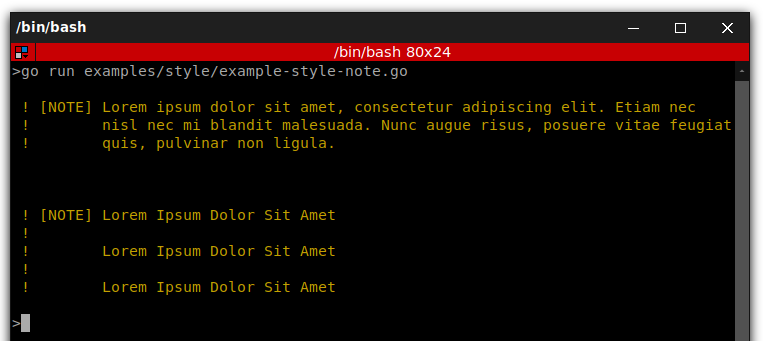
note()
It displays the given string or array of strings as a highlighted admonition. Use this helper sparingly to avoid cluttering command’s output:
// use simple strings for short messages
cmd.PrintNote("Lorem Ipsum Dolor Sit Amet, [...]")

// consider using arrays when displaying long messages
cmd.PrintNotes([]string{
  "Lorem Ipsum Dolor Sit Amet",
  "Lorem Ipsum Dolor Sit Amet",
  "Lorem Ipsum Dolor Sit Amet",
})
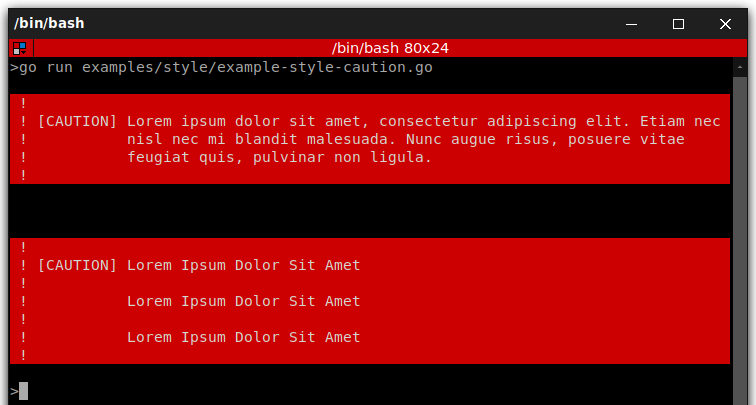
caution()
Similar to the note() helper, but the contents are more prominently highlighted. The resulting contents resemble an error message, so you should avoid using this helper unless strictly necessary:
// use simple strings for short messages
cmd.PrintCaution("Lorem Ipsum Dolor Sit Amet, [...]")

// consider using arrays when displaying long messages
cmd.PrintCautions([]string{
  "Lorem Ipsum Dolor Sit Amet",
  "Lorem Ipsum Dolor Sit Amet",
  "Lorem Ipsum Dolor Sit Amet",
})
Result Methods
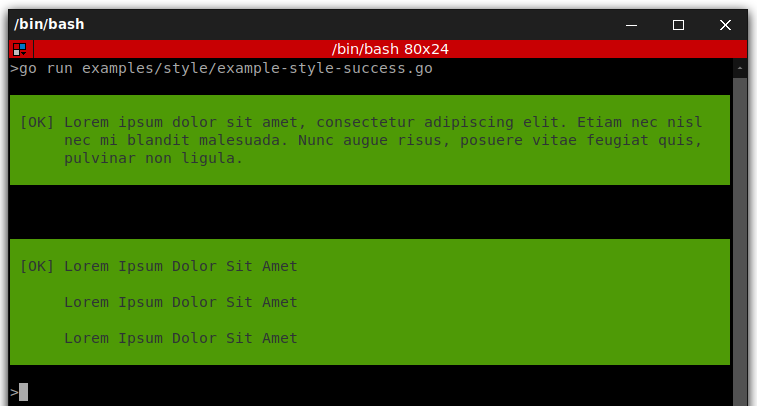
success()
It displays the given string or array of strings highlighted as a successful message (with a green background and the [OK] label). It’s meant to be used once to display the final result of executing the given command, but you can use it repeatedly during the execution of the command:
// use simple strings for short messages
cmd.PrintSuccess("Lorem Ipsum Dolor Sit Amet, [...]")

// consider using arrays when displaying long messages
cmd.PrintSuccesses([]string{
  "Lorem Ipsum Dolor Sit Amet",
  "Lorem Ipsum Dolor Sit Amet",
  "Lorem Ipsum Dolor Sit Amet",
})
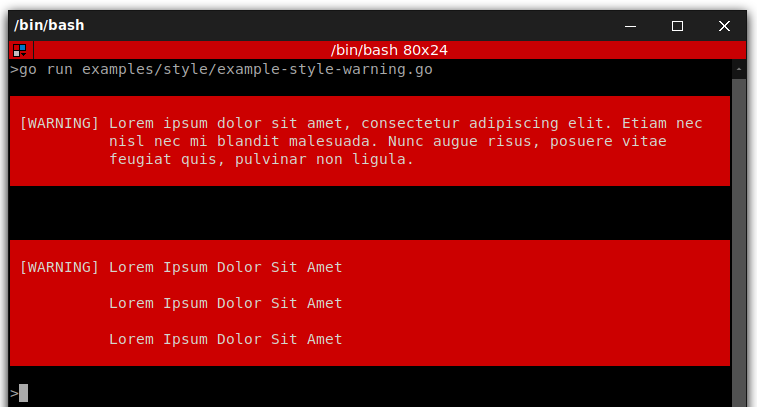
warning()
It displays the given string or array of strings highlighted as a warning message (with a red background and the [WARNING] label). It’s meant to be used once to display the final result of executing the given command, but you can use it repeatedly during the execution of the command:
// use simple strings for short messages
cmd.PrintWarning("Lorem Ipsum Dolor Sit Amet, [...]")

// consider using arrays when displaying long messages
cmd.PrintWarnings([]string{
  "Lorem Ipsum Dolor Sit Amet",
  "Lorem Ipsum Dolor Sit Amet",
  "Lorem Ipsum Dolor Sit Amet",
})
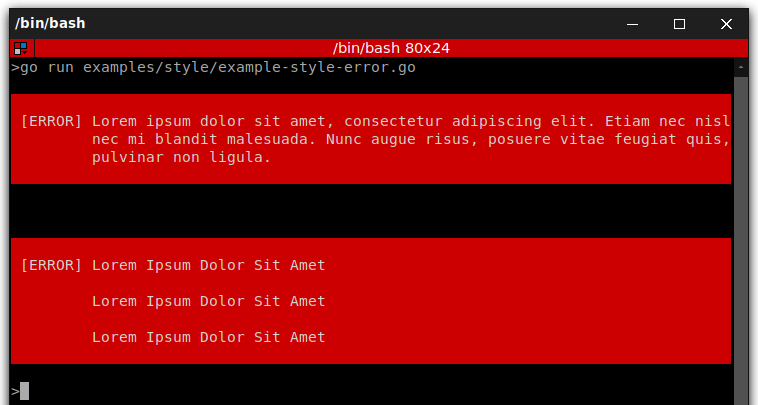
error()
It displays the given string or array of strings highlighted as an error message (with a red background and the [ERROR] label). It’s meant to be used once to display the final result of executing the given command, but you can use it repeatedly during the execution of the command:
// use simple strings for short messages
cmd.PrintError("Lorem Ipsum Dolor Sit Amet, [...]")

// consider using arrays when displaying long messages
cmd.PrintErrors([]string{
  "Lorem Ipsum Dolor Sit Amet",
  "Lorem Ipsum Dolor Sit Amet",
  "Lorem Ipsum Dolor Sit Amet",
})
How to Color the Console Output
Whenever you output text, you can use OutputInterface to surround the text with tags to color its output. For example:
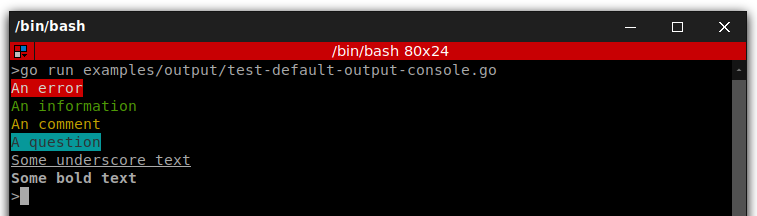
Predefined style tags
package main

import "github.com/DrSmithFr/go-console/output"

func main() {
  // creating new output
  out := output.NewCliOutput(true, nil)

  // white text on a red background
  out.Println("<error>An error</error>")

  // green text
  out.Println("<info>An information</info>")

  // yellow text
  out.Println("<comment>An comment</comment>")

  // black text on a cyan background
  out.Println("<question>A question</question>")

  // underscore text
  out.Println("<u>Some underscore text</u>")

  // bold text
  out.Println("<b>Some bold text</b>")
}
The closing tag can be replaced by </>, which revokes all formatting options established by the last opened tag.
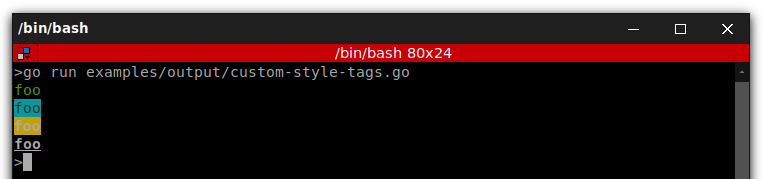
Generic style tags
You can also set these colors and options directly inside the tag name:
package main

import "github.com/DrSmithFr/go-console/output"

func main() {
  // green text
  out := output.NewCliOutput(true, nil)

  // black text on a cyan background
  out.Println("<fg=green>foo</>")

  // green text
  out.Println("<fg=black;bg=cyan>foo</>")

  // bold text on a yellow background
  out.Println("<bg=yellow;options=bold>foo</>")

  // bold text with underscore
  out.Println("<options=bold,underscore>foo</>")
}
If you need to render a tag literally, escape it with a backslash: <info> or use the escape() method to escape all the tags included in the given string.
Custom color tags
It is possible to define your own styles using the OutputFormatterStyle
package main

import (
  "github.com/DrSmithFr/go-console/color"
  "github.com/DrSmithFr/go-console/formatter"
  "github.com/DrSmithFr/go-console/output"
)

func main() {
  // creating new output
  out := output.NewCliOutput(true, nil)

  // create new style
  s := formatter.NewOutputFormatterStyle(color.Red, color.Yellow, []string{color.Bold, color.Blink})

  // add style to formatter
  out.Formatter().SetStyle("fire", *s)

  // use the new style
  out.Println("<fire>foo</fire>")
}

Available foreground and background colors are: black, red, green, yellow, blue, magenta, cyan and white. And available options are: bold, underscore, blink, reverse (enables the “reverse video” mode where the background and foreground colors are swapped) and conceal (sets the foreground color to transparent, making the typed text invisible - although it can be selected and copied; this option is commonly used when asking the user to type sensitive information).
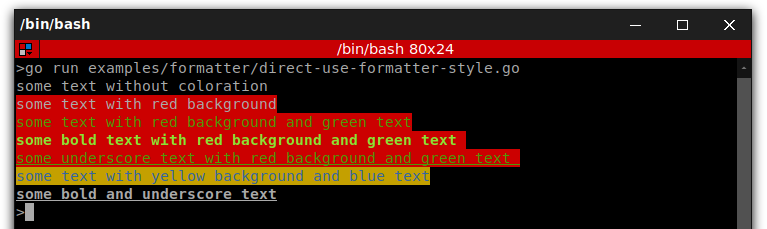
By using colors in the command output, you can distinguish different types of output (e.g. important messages, titles, comments, etc.).
package main

import (
  "fmt"
  "github.com/DrSmithFr/go-console/color"
  "github.com/DrSmithFr/go-console/formatter"
)

func main() {
  // create a default style
  s1 := formatter.NewOutputFormatterStyle(color.Null, color.Null, nil)
  fmt.Printf(s1.Apply("some text without coloration\n"))

  s1.SetBackground(color.Red)
  fmt.Printf(s1.Apply("some text with red background\n"))

  s1.SetForeground(color.Green)
  fmt.Printf(s1.Apply("some text with red background and green text\n"))

  s1.SetOption(color.Bold)
  fmt.Printf(s1.Apply("some bold text with red background and green text \n"))

  // override all options in one time
  s1.SetOptions([]string{color.Underscore})
  fmt.Printf(s1.Apply("some underscore text with red background and green text \n"))

  // quick declaration
  s2 := formatter.NewOutputFormatterStyle(color.Blue, color.Yellow, nil)
  fmt.Printf(s2.Apply("some text with yellow background and blue text\n"))

  // quick declaration with options
  s3 := formatter.NewOutputFormatterStyle(color.Default, color.Default, []string{color.Underscore, color.Bold})
  fmt.Printf(s3.Apply("some bold and underscore text\n"))
}
The OutputFormatterStyle is the simplest way to color output. It is not mean to be use directly, but to defined custom tags used by OutputFormatterInterface.
How to use verbosity levels
Console commands have different verbosity levels, which determine the messages displayed in their output.
By default, commands display only the most useful messages,
but you can control their verbosity with the --quiet|-q, --verbose|-v, --very-verbose|-vv, --debug|-vvv options.
Basic Usage
package main

import (
  "github.com/DrSmithFr/go-console"
  "github.com/DrSmithFr/go-console/verbosity"
)

func main() {
  cmd := go_console.NewScript()

  if cmd.Verbosity() == verbosity.Verbose {
    cmd.PrintText("Lorem Ipsum Dolor Sit Amet")
  }

  // available methods: .IsQuiet(), .IsVerbose(), .IsVeryVerbose(), .IsDebug()
  if cmd.IsVeryVerbose() {
    cmd.PrintText("Lorem Ipsum Dolor Sit Amet")
  }

  // or using directly the output instance
  out := cmd.Output

  if out.Verbosity() == verbosity.Verbose {
    out.Println("Lorem Ipsum Dolor Sit Amet")
  }

  // available methods: .IsQuiet(), .IsVerbose(), .IsVeryVerbose(), .IsDebug()
  if out.IsVeryVerbose() {
    out.Println("Lorem Ipsum Dolor Sit Amet")
  }
}
When the quiet level is used, all output is suppressed as the default write() method returns without actually printing.
How to ask for user input
The QuestionHelper provides functions to ask the user for more information. It can be used to ask for confirmation, to ask for a value, or to ask for a choice.
Helper Usage
The Question Helper needs an io.Reader instance as the first argument and OutputInterface instance as the second argument.
package main

import (
  "github.com/DrSmithFr/go-console"
  "github.com/DrSmithFr/go-console/question"
  "os"
)

func main() {
  cmd := go_console.NewScript().Build()
  qh := question.NewHelper(os.Stdin, cmd.Output)
}
Asking the User for Information
The Question Helper has a single method ask() that takes a Question instance as its first argument and returns the user’s answer as a string.
package main

import (
  "github.com/DrSmithFr/go-console"
  "github.com/DrSmithFr/go-console/question"
  "os"
)

func main() {
  cmd := go_console.NewScript().Build()
  qh := question.NewHelper(os.Stdin, cmd.Output)

  // Simple question with default answer
  name := qh.Ask(
    question.
      NewQuestion("What is your name?").
      SetDefaultAnswer("John Doe"),
  )

  cmd.PrintText("Hello " + name)
}
The user will be asked “What is your name?”. They can type some name which will be returned by the ask() method.
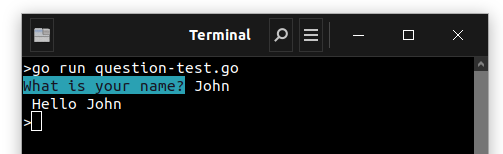
If they leave it empty, the default value (“John Doe” here) is returned.
![]()
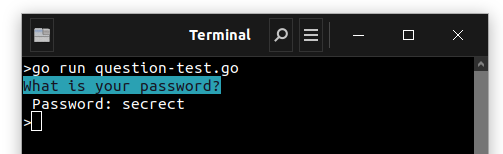
Hiding the User’s Response
You can also ask a question and hide the response. This is particularly convenient for passwords:
package main

import (
  "github.com/DrSmithFr/go-console"
  "github.com/DrSmithFr/go-console/question"
  "os"
)

func main() {
  cmd := go_console.NewScript().Build()
  qh := question.NewHelper(os.Stdin, cmd.Output)

  // Simple question with hidden answer
  pass := qh.Ask(
    question.
      NewQuestion("What is your password?").
      SetHidden(true),
  )

  cmd.PrintText("Password: " + pass)
}
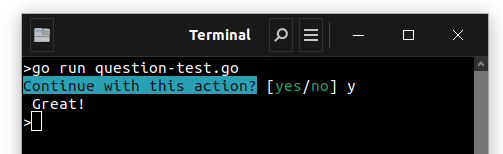
Asking the User for Confirmation
Suppose you want to confirm an action before actually executing it. Add the following to your command:
package main

import (
  "github.com/DrSmithFr/go-console"
  "github.com/DrSmithFr/go-console/question"
  "github.com/DrSmithFr/go-console/question/answers"
  "os"
)

func main() {
  cmd := go_console.NewScript().Build()
  qh := question.NewHelper(os.Stdin, cmd.Output)

  // Simple confirmation question
  answer := qh.Ask(
    question.
      NewComfirmation("Continue with this action?").
      SetDefaultAnswer(answers.Yes).
      SetMaxAttempts(2),
  )
  if answer == answers.Yes {
    cmd.PrintText("Great!")
  } else {
    cmd.PrintText("... ok :(")
  }
}
In this case, the user will be asked “Continue with this action?”. If the user answers with y it returns “
yes” (answers.YES) or “no” (answers.NO) if they answer with n.
The default value to return if the user doesn’t enter any valid input can be modify using the SetDefaultAnswer() (By
default it is set to answers.NONE forcing the user to answer).
Note
You can customize the regex used to check if the answer means “yes” using the
SetYesRegex()method. (By default it is set to^(y|yes|true|1)$)You can customize the regex used to check if the answer means “no” using the
SetNoRegex()method. (By default it is set to^(n|no|false|0)$)You can define your own error message using
SetErrorMessage()by default it is set to"Value '%s' is invalid"
Asking the User for a Choice
If you have a predefined set of answers the user can choose from, you could use a ChoiceQuestion which makes sure that the user can only enter a valid string from a predefined list:
package main

import (
  "github.com/DrSmithFr/go-console"
  "github.com/DrSmithFr/go-console/question"
  "os"
)

func main() {
  cmd := go_console.NewScript().Build()
  qh := question.NewHelper(os.Stdin, cmd.Output)

  colors := []string{"red", "green", "blue", "yellow", "black", "white"}

  // Choice question with only one answer allowed
  answer := qh.Ask(
    question.
      NewChoices("What is your overall favorite color?", colors).
      SetMaxAttempts(3),
  )

  cmd.PrintText("Your overall favorite color is " + answer)
}
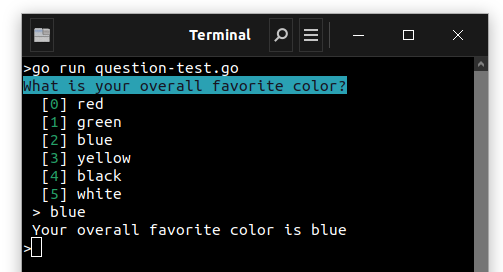
If the user enters an invalid or empty string, an error message is shown and the user is asked to provide the answer another time, until they enter a valid string or reach the maximum number of attempts.
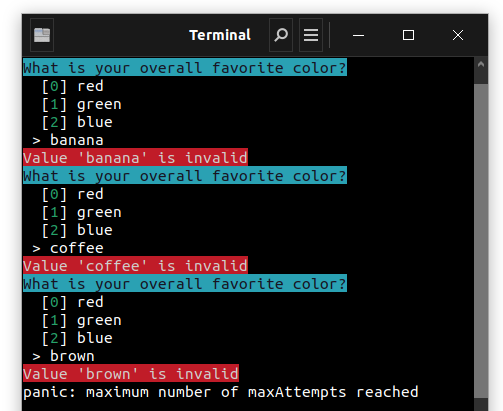
Note
The default value for the maximum number of attempts is 0. which means an infinite number of attempts.
You can define your own error message using
SetErrorMessage()by default it is set to"Value '%s' is invalid"
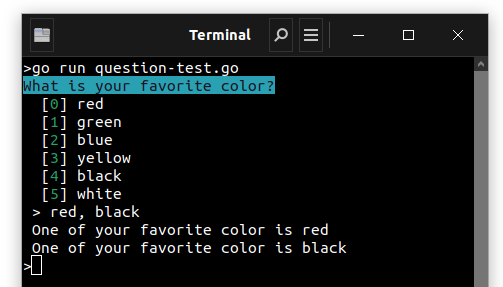
Multiple Choices
Sometimes, multiple answers can be given. The ChoiceQuestion provides this feature using comma separated values.
This is disabled by default, to enable this use SetMultiselect(true):
package main

import (
  "github.com/DrSmithFr/go-console"
  "github.com/DrSmithFr/go-console/question"
  "os"
  "strings"
)

func main() {
  cmd := go_console.NewScript().Build()
  qh := question.NewHelper(os.Stdin, cmd.Output)

  colorList := []string{"red", "green", "blue", "yellow", "black", "white"}

  // Choice question with multiple answers allowed
  answer := qh.Ask(
    question.
      NewChoices("What is your favorite color?", colorList).
      SetMultiselect(true).
      SetMaxAttempts(3),
  )

  // Retrieve all selected colors by splitting the answer on commas
  colors := strings.Split(answer, ",")

  for _, color := range colors {
    cmd.PrintText("One of your favorite color is " + color)
  }
}
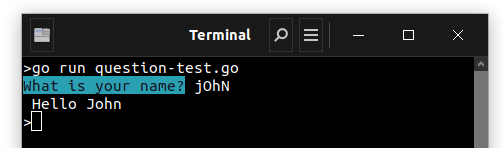
Normalizing the Answer
Before validating the answer, you can “normalize” it to fix minor errors or tweak it as needed.
For instance, in the next example you ask for the user firstname. In case the user did capitalize the first error by
mistake,
you can modify the answer provided before validating it. To do so, configure a normalizer using the SetNormalizer()
method:
package main

import (
  "github.com/DrSmithFr/go-console"
  "github.com/DrSmithFr/go-console/question"
  "golang.org/x/text/cases"
  "golang.org/x/text/language"
  "os"
)

func main() {
  cmd := go_console.NewScript().Build()
  qh := question.NewHelper(os.Stdin, cmd.Output)

  // Simple question with normalizer
  firstname := qh.Ask(
    question.
      NewQuestion("What is your name?").
      SetNormalizer(func(answer string) string {
        return cases.Title(language.English, cases.Compact).String(answer)
      }),
  )
  cmd.PrintText("Hello " + firstname)
}
Note
Adding a custom normalizer on QuestionConfirmation and QuestionChoices will override the default one. If you want to keep the default behaviour and add your own logic before or after, see the next section about ChainNormalizer.
The normalizer is called first and the returned value is used as the input of the validator. If the answer is invalid, don’t throw exceptions in the normalizer and let the validator handle those errors.
The ChainNormalizer
The MakeChainNormalizer allows you to merge multiple normalizers. Each normalizer will be called in the order they are
defined.
package main

import (
  "github.com/DrSmithFr/go-console"
  "github.com/DrSmithFr/go-console/question"
  "github.com/DrSmithFr/go-console/question/normalizer"
  "os"
  "strings"
)

func main() {
  cmd := go_console.NewScript().Build()
  qh := question.NewHelper(os.Stdin, cmd.Output)

  // Simple question with normalizer
  firstname := qh.Ask(
    question.
      NewQuestion("What is your name?").
      SetNormalizer(
        normalizer.MakeChainedNormalizer(
          strings.ToLower,
          normalizer.Ucfirst,
          func(answer string) string {
            return answer + "!"
          },
        ),
      ),
  )
  cmd.PrintText("Hello " + firstname)
}

Note
a normalizer is a function that takes a string as input and returns a string as output. That means you can use any function that respects this signature, from the standard library to your own functions.
With the same logic, you can encapsulate the default normalizer using the MakeChainNormalizer method,
however, you will need to pass the question as a parameter of normalizer.DefaultChoicesNormalizer().
package main

import (
  "github.com/DrSmithFr/go-console/question"
  "github.com/DrSmithFr/go-console/question/normalizer"
  "strings"
)

func main() {
  // chain normalizer example using including the default normalizer
  q := question.
    NewChoices("What is your favorite color?", []string{"red", "blue", "yellow"}).
    SetMultiselect(true).
    SetMaxAttempts(3)

  customNormalizer := normalizer.
    MakeChainedNormalizer(
      strings.ToLower,
      q.GetDefaultNormalizer(),
      normalizer.Ucfirst,
      func(answer string) string {
        return answer + "!"
      },
    )

  q.SetNormalizer(customNormalizer)
}
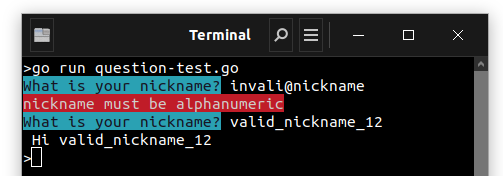
Validating the Answer
You can even validate the answer. you can configure a validator using the SetValidator() method:
package main

import (
  "errors"
  "github.com/DrSmithFr/go-console"
  "github.com/DrSmithFr/go-console/question"
  "os"
  "regexp"
)

func main() {
  cmd := go_console.NewScript().Build()
  qh := question.NewHelper(os.Stdin, cmd.Output)

  // Simple question with custom validator
  nickname := qh.Ask(
    question.
      NewQuestion("What is your nickname?").
      SetValidator(func(answer string) error {
        regex := regexp.MustCompile("^(\\w|_|-)*$")
        if match := regex.MatchString(answer); !match {
          return errors.New("nickname must be alphanumeric")
        }

        return nil
      }),
  )
  cmd.PrintText("Hi " + nickname)
}
It should return an error if there is something wrong. The error message is displayed in the console, so it is a good practice to put some useful information in it.
Note
Adding a custom validator on QuestionConfirmation and QuestionChoices will override the default one. If you want to keep the default behaviour and add your own logic before or after, see the next section about ChainedValidator.
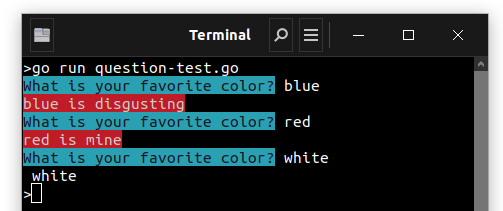
The ChainedValidator
The MakeChainedValidator allows you to merge multiple validators.
Each validator will be called in the order they are defined.
package main

import (
  "errors"
  "github.com/DrSmithFr/go-console"
  "github.com/DrSmithFr/go-console/question"
  "github.com/DrSmithFr/go-console/question/validator"
  "os"
)

func main() {
  cmd := go_console.NewScript().Build()
  qh := question.NewHelper(os.Stdin, cmd.Output)

  // chain validator example
  answer := qh.Ask(
    question.
      NewQuestion("What is your favorite color?").
      SetValidator(
        validator.
          MakeChainedValidator(
            func(answer string) error {
              if answer == "red" {
                return errors.New("red is mine")
              }

              return nil
            },
            func(answer string) error {
              if answer == "blue" {
                return errors.New("blue is disgusting")
              }

              return nil
            },
          ),
      ),
  )
  cmd.PrintText(answer)
}
How to display tables in the console
When building a console application it may be useful to display tabular data:
Basic Usage
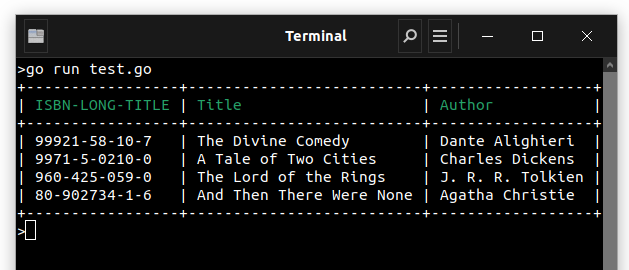
To display a table, use Table, set the headers, set the rows and then render the table:
package main

import (
  "github.com/DrSmithFr/go-console"
  "github.com/DrSmithFr/go-console/table"
)

func main() {
  cmd := go_console.NewScript().Build()

  tab := table.
    NewTable().
    AddHeadersFromString(
      [][]string{
        {"ISBN-LONG-TITLE", "Title", "Author"},
      },
    )

  tab.
    AddRowsFromString(
      [][]string{
        {"99921-58-10-7", "The Divine Comedy", "Dante Alighieri"},
        {"9971-5-0210-0", "A Tale of Two Cities", "Charles Dickens"},
        {"960-425-059-0", "The Lord of the Rings", "J. R. R. Tolkien"},
        {"80-902734-1-6", "And Then There Were None", "Agatha Christie"},
      },
    )

  render := table.
    NewRender(cmd.Output).
    SetContent(tab)

  render.Render()
}
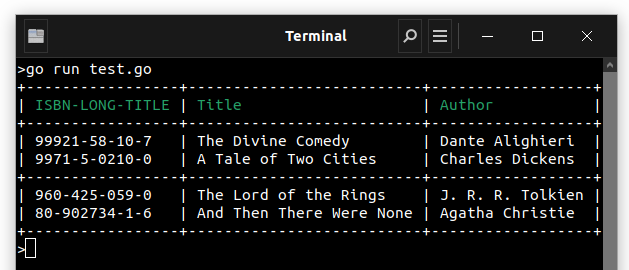
You can add a table separator anywhere in the output by passing an instance of TableSeparator as a row:
  tab.
    AddRowsFromString(
      [][]string{
        {"99921-58-10-7", "The Divine Comedy", "Dante Alighieri"},
        {"9971-5-0210-0", "A Tale of Two Cities", "Charles Dickens"},
        {"---"}, // or "==="
        {"960-425-059-0", "The Lord of the Rings", "J. R. R. Tolkien"},
        {"80-902734-1-6", "And Then There Were None", "Agatha Christie"},
      },
    )
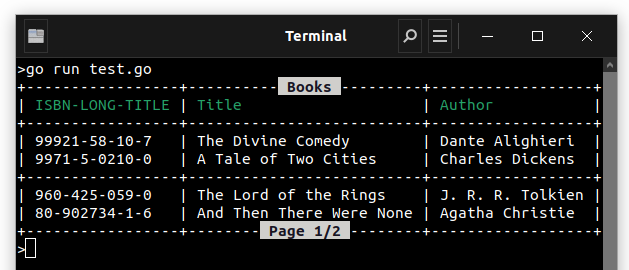
You can optionally display titles at the top and the bottom of the table:
  tab.
    SetHeaderTitle("Books").
    SetFooterTitle("Page 1/2")
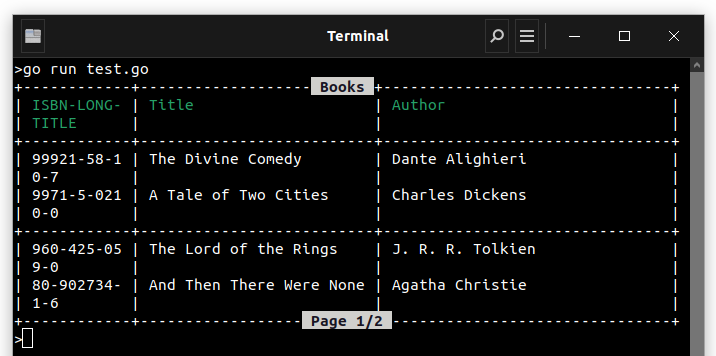
By default, the width of the columns is calculated automatically based on their contents. Use the SetColumnWidths() method to set the column widths explicitly:
    // this is equivalent to the calling SetColumnsMinWidths() and SetColumnsMaxWidths() with the same values
render.
  SetColumnsWidths(map[int]int{
    0: 10,
    1: 0,
    2: 30,
  })
render.Render()
In this example, the first column width will be 10, the last column width will be 30 and the second column width will be calculated automatically because of the 0 value.
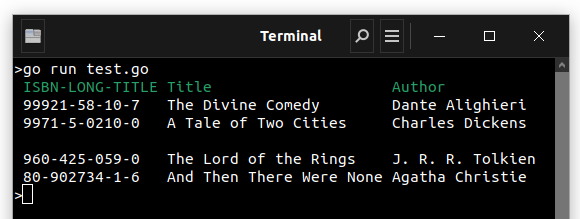
You can also set the width individually for each column with the SetColumnWidth() method. Its first argument is the column index (starting from 0) and the second argument is the column width:
render.SetColumnWidth(0, 10)
render.SetColumnWidth(2, 10)

render.Render()
The output of this command will be:
Note that you can also set the max and min width of a column individually:
render.SetColumnMaxWidth(0, 10)
render.SetColumnMinWidth(1, 15)

render.
  SetColumnsMinWidths(map[int]int{
    0: 10,
    1: 0,
    2: 30,
  })

render.
  SetColumnsMaxWidths(map[int]int{
    0: 10,
    1: 0,
    2: 30,
  })

render.Render()
Table Styling
The table style can be changed to any built-in styles via SetStyleFromName()
// same as calling nothing
render.SetStyleFromName("default")

// changes the default style to compact
render.SetStyleFromName("compact")
render.Render()
This code results in:
You can also set the style to borderless:
// changes the default style to compact
render.SetStyleFromName("borderless")
render.Render()
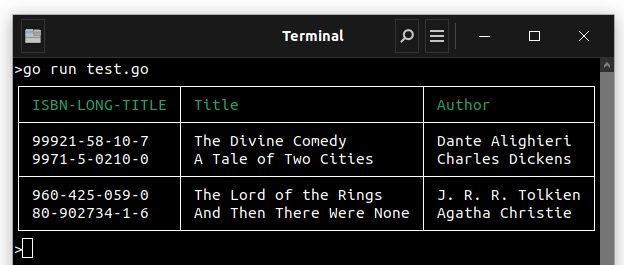
You can also set the style to box:
// changes the default style to compact
render.SetStyleFromName("box")
render.Render()
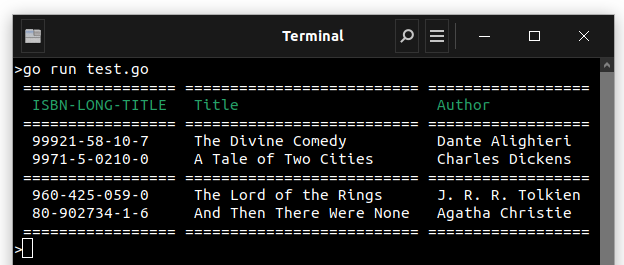
You can also set the style to box-double:
// changes the default style to compact
render.SetStyleFromName("box-double")
render.Render()

Note:
Using shortcut “—” and “===” to insert a tableSeparator with style
box-doublewill result in simple or double line separator. On every other style, it will result in a simple line separator.
If the built-in styles do not fit your need, define your own:
customStyle := table.
  NewTableStyle().
  SetHorizontalOutsideBorderChar("═").
  SetHorizontalInsideBorderChar("─").
  SetVerticalOutsideBorderChar("║").
  SetVerticalInsideBorderChar("│").
  SetCrossingChars("┼", "╔", "╤", "╗", "╢", "╝", "╧", "╚", "╟", "╠", "╪", "╣")

render.SetStyle(customStyle)
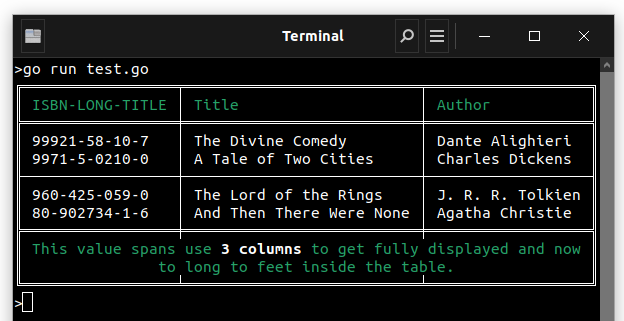
Spanning Multiple Columns
To make a table cell that spans multiple columns you can use a TableCell:
package main

import (
  "github.com/DrSmithFr/go-console"
  "github.com/DrSmithFr/go-console/table"
)

func main() {
  cmd := go_console.NewScript().Build()

  tab := table.
    NewTable().
    AddHeadersFromString(
      [][]string{
        {"ISBN-LONG-TITLE", "Title", "Author"},
      },
    )

  tab.
    AddRowsFromString(
      [][]string{
        {"99921-58-10-7", "The Divine Comedy", "Dante Alighieri"},
        {"9971-5-0210-0", "A Tale of Two Cities", "Charles Dickens"},
        {"---"},
        {"960-425-059-0", "The Lord of the Rings", "J. R. R. Tolkien"},
        {"80-902734-1-6", "And Then There Were None", "Agatha Christie"},
        {"==="},
      },
    ).
    AddRow(
      &table.TableRow{
        Columns: map[int]table.TableColumnInterface{
          0: &table.TableColumn{
            Cell: &table.TableCell{
              Value:   "<info>This value spans use <b>3 columns</b> to get fully displayed and now to long to feet inside the table.</info>",
              Colspan: 3,
              PadType: table.PadToCenter,
            },
          },
        },
      },
    )

  render := table.
    NewRender(cmd.Output).
    SetContent(tab)

  render.SetStyleFromName("box-double")

  render.Render()
}
This results in:
Note:
You can create a title using a header cell that spans the entire table width.
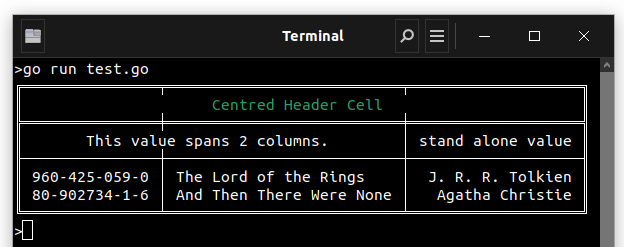
Padding management
You can set the padding type for each cell or column individually:
PadToLeft(default)PadToCenterPadToRight
Note:
If you set a cell padding, the column padding will be ignored.
If you set a column padding, the default padding (defined by style) will be ignored.
package main

import (
  "github.com/DrSmithFr/go-console"
  "github.com/DrSmithFr/go-console/table"
)

func main() {
  cmd := go_console.NewScript().Build()

  tab := table.
    NewTable().
    SetColumnPadding(3, table.PadToRight).
    AddHeader(
      &table.TableRow{
        Columns: map[int]table.TableColumnInterface{
          0: &table.TableColumn{
            Cell: &table.TableCell{
              Value:   "Centred Header Cell",
              Colspan: 3,
              PadType: table.PadToCenter,
            },
          },
        },
      },
    ).
    AddRow(
      table.
        NewTableRow().
        AddColumn(
          table.
            NewTableColumn().
            SetCell(
              table.
                NewTableCell("This value spans 2 columns.").
                SetPadType(table.PadToCenter).
                SetColspan(2),
            ),
        ).
        AddColumn(
          table.
            NewTableColumn().
            SetCell(
              table.
                NewTableCell("stand alone value"),
            ),
        ),
    ).
    AddTableSeparator().
    AddRowsFromString(
      [][]string{
        {"960-425-059-0", "The Lord of the Rings", "J. R. R. Tolkien"},
        {"80-902734-1-6", "And Then There Were None", "Agatha Christie"},
      },
    )

  render := table.
    NewRender(cmd.Output).
    SetContent(tab)

  render.SetColumnMinWidth(2, 13)

  render.SetStyleFromName("box-double")

  render.Render()
}
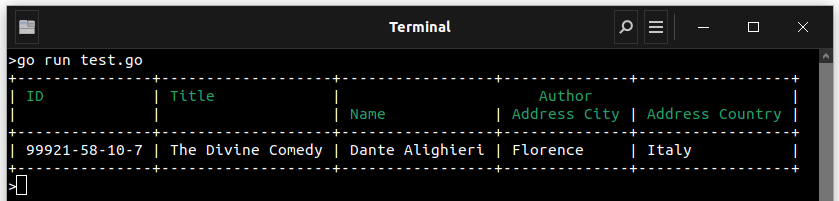
Parsing Struct and List
You can generate a table directly form a struct or a list:
Note:
Parsing List or Slice will behave the same as parsing a single struct. The only difference is that rows will be generated for each item in the list.
ParsingConfig is optional and behaves the same for both structs and lists.
Pointer fields will be dereferenced and their value will be used instead.
ackage main

import (
	"github.com/DrSmithFr/go-console"
	"github.com/DrSmithFr/go-console/table"
)

func main() {

	type Address struct {
		City    string
		Country string
	}

	type Author struct {
		Name    string
		age     int
		Address *Address `display:"inline"`
	}

	type Book struct {
		ISBN   *string `header:"ID"`
		Title  string
		Secret string `display:"hidden"`
		Author *Author
	}

	ptrStr := func(str string) *string {
		return &str
	}

	book := Book{
		ISBN:   ptrStr("99921-58-10-7"),
		Title:  "The Divine Comedy",
		Secret: "This is a secret!",
		Author: &Author{
			Name: "Dante Alighieri",
			age:  56,
			Address: &Address{
				City:    "Florence",
				Country: "Italy",
			},
		},
	}

	cmd := go_console.NewScript().Build()

	tab := table.
		NewTable().

		// Helpers to set the parser config.
		SetParseTagsFieldsOnly(false).
		SetParseUnexportedFields(false).
		SetParseMaxDepth(1).

		// Or set the parser config directly.
		SetParseConfig(table.ParserConfig{
			TagsFieldsOnly:   false,
			UnexportedFields: false,
			MaxDepth:         1,
		})

	tab.Parse(book)

	render := table.
		NewRender(cmd.Output).
		SetContent(tab)

	render.Render()
}
This results in:
Parsing Tags
DisplayTag
With the display tag, you can set the display mode for each field:
hidden(to hide the field value and header)inline(to inline value, see MaxDepth for more details)
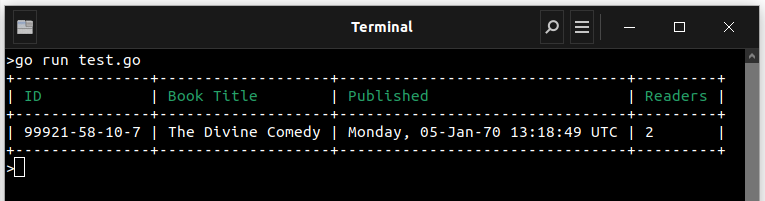
HeaderTag
You can set the header name for each field using the header tag, and depending on the field type, you can also set some options use to compile value for the given field.
type Book struct {
  ISBN    string   `header:"ID"`
  Title   string   `header:"Book Title"`
  PrintAt int64    `header:"Published,timestamp(ms|utc|RFC850)"`
  Readers []string `header:"Readers,count"`
}
This results in:
HeaderTag Timestamp Options
const (
	// Timestamp unit
  TimestampFromMillisecondsHeaderTag = "ms"

  // Timezone
	TimestampAsUTCHeaderTag = "utc"
	TimestampAsLocalHeaderTag = "local"

	// Formats
	TimestampFormatHumanHeaderTag = "human"
	TimestampFormatANSICHeaderTag = "ANSIC"
	TimestampFormatUnixDateCHeaderTag = "UnixDate"
	TimestampFormatRubyDateHeaderTag = "RubyDate"
	TimestampFormatRFC822HeaderTag = "RFC822"
	TimestampFormatRFC822ZHeaderTag = "RFC822Z"
	TimestampFormatRFC850HeaderTag = "RFC850"
	TimestampFormatRFC1123HeaderTag = "RFC1123"
	TimestampFormatRFC1123ZHeaderTag = "RFC1123Z" // default one.
	TimestampFormatRFC3339HeaderTag = "RFC3339"
	TimestampFormatARFC3339NanoHeaderTag = "RFC3339Nano"
)
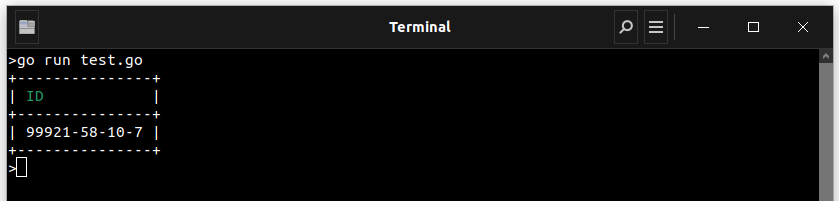
Parsing Config
TagsFieldsOnly
Using the same example as above, we can change the parsing config to get different results:
  SetParseConfig(table.ParserConfig{
    TagsFieldsOnly:   true,
    UnexportedFields: false,
    MaxDepth:         1,
  })
Because Book.ISBN is the only field that implement a header tag, it will result in:
UnexportedFields
Using the same example as above, we can change the UnexportedFields config to get different results:
  SetParseConfig(table.ParserConfig{
    TagsFieldsOnly:   false,
    UnexportedFields: true,
    MaxDepth:         1,
  })
Now Author.age will also be included in the result:
MaxDepth
Using the same example as above, we can change the MaxDepth config to get different results:
Note:
MaxDepth is used to limit the depth of the parsing. It is useful to avoid infinite recursion when parsing a struct that contains itself.
When MaxDepth is set rematch, the parser will display
fmt.Sprintf("%v", field).
  SetParseConfig(table.ParserConfig{
    TagsFieldsOnly:   false,
    UnexportedFields: false,
    MaxDepth:         0,
  })
Now Author became to deep will be displayed as &{Dante Alighieri 56 0xc0000b4000}:
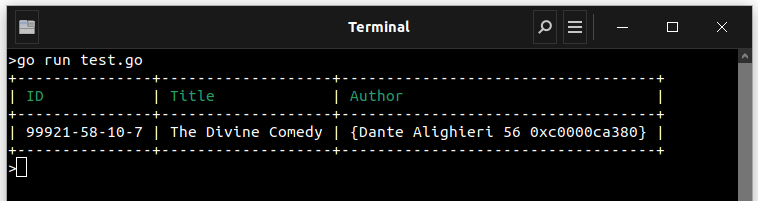
Note:
If you use
display:"inline"tag, the parser will count them as the same depth level as the parent struct. (even with multiple levels of inline structs)
For example, if we change the Author struct to:
type Address struct {
  City    string
  Country string
}

type Author struct {
  Name    string
  age     int
  Address *Address `display:"inline"`
}

type Book struct {
  ISBN   *string `header:"ID"`
  Title  string
  Secret string  `display:"hidden"`
  Author *Author `display:"inline"`
}
then the result with MaxDepth set to 0 will be:

Generate Table from JSON data
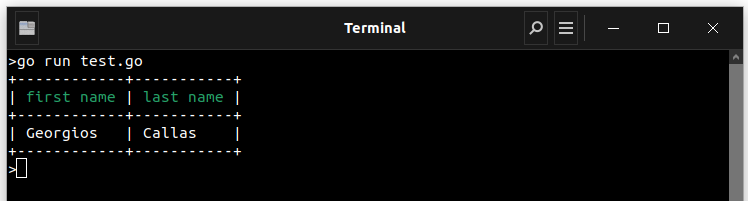
You can generate a table directly form a JSON formatted []Byte:
package main

import (
	"encoding/json"
	"github.com/DrSmithFr/go-console"
	"github.com/DrSmithFr/go-console/table"
)

func main() {
	cmd := go_console.NewScript().Build()

	jsonData := getMyJSONBytes()

	tab := table.
		NewTable().
		ParseJSON(jsonData)

	render := table.
		NewRender(cmd.Output).
		SetContent(tab)

	render.Render()
}

func getMyJSONBytes() []byte {
	data := struct {
		// json tags are optionally but if set they are being used for the headers on `PrintJSON`.
		Firstname string `json:"first name"`
		Lastname  string `json:"last name"`
	}{"Georgios", "Callas"}
	b, err := json.MarshalIndent(data, "", "    ")
	if err != nil {
		panic(err)
	}

	return b
}
Internally the JSON is Unmarshalled and can get parsed as a struct. So you can use the same parsing configuration as for the Parsing Struct and List to manage the display.
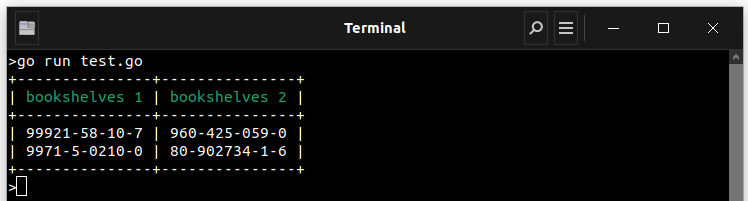
Parsing Map
You can generate a table directly form a map[string]interface{}:
Note:
Keys are used as headers.
Values are used as rows and must implement
fmt.Stringerinterface.
package main

import (
	"github.com/DrSmithFr/go-console"
	"github.com/DrSmithFr/go-console/table"
)

type Book struct {
	ISBN  string
	Title string
}

func (b Book) String() string {
	return b.ISBN
}

func main() {
	books := map[string][]Book{
		"bookshelves 1": {
			{ISBN: "99921-58-10-7", Title: "The Divine Comedy"},
			{ISBN: "9971-5-0210-0", Title: "A Tale of Two Cities"},
		},
		"bookshelves 2": {
			{ISBN: "960-425-059-0", Title: "The Lord of the Rings"},
			{ISBN: "80-902734-1-6", Title: "And Then There Were None"},
		},
	}

	cmd := go_console.NewScript().Build()

	tab := table.
		NewTable().
		Parse(books)

	render := table.
		NewRender(cmd.Output).
		SetContent(tab)

	render.Render()
}
Will result in: